Field Photography · PhotoPills · Lesson 6 Camera Tools on the Map
1 / 10
Field Photography · PhotoPills
Camera Tools on the Map
Everything so far has told you where and when. This lesson tells you what your actual camera and lens will capture, drawn right on the map, before you leave home.

Back in Lesson 2, we mentioned the Map Settings button has a "Map tools" section. This is where it lives — three tools that bring your specific camera, lens, and aperture into the planning.

☝️
One tool at a time
Field of View, Depth of Field, and Sun/Moon each serve a different purpose — you can only have one active on the map at once.
Field Photography · PhotoPills
Camera Mode vs. Drone Mode
Camera Mode
Drone Mode
The default — for shots taken standing on the ground
For shots taken from a drone in the air
Uses the map tools in this lesson
Adds an altitude slider and composition grid overlay
Field of View, Depth of Field, Sun/Moon
Shows the drone's frame directly on the map as you change altitude

Switch between them at the top of the Map Settings panel. This lesson focuses on Camera mode — the one you'll use for nearly everything.

Field Photography · PhotoPills
The Three Map Tools
🖼️
Field of View
What's inside your frame, drawn on the map.
🎯
Depth of Field
Field of View plus what's actually in focus.
🌗
Sun/Moon
The exact distance to get the Sun or Moon at the size you want.
Field Photography · PhotoPills
Field of View Tool
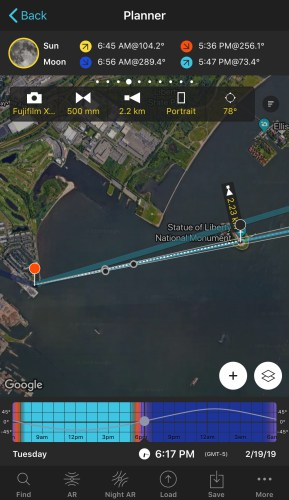
Planner map with the Field of View tool active, showing the frame lines aimed at the Statue of Liberty
Planning the Moon over the Statue of Liberty — the frame lines show exactly what the lens will capture

Once you've picked a spot and time, the FoV tool draws your camera's frame directly on the map. Everything outside the frame lines gets darkened, so you can see at a glance whether your lens is wide enough — or too wide.
Field Photography · PhotoPills
Setting Up The FoV Tool
  1. 📷
    Camera
    Select your camera — the sensor's crop factor is built into the calculation.
  2. 🔭
    Focal length
    Nominal or 35mm-equivalent, plus any teleconverter.
  3. 📐
    Orientation & azimuth
    Landscape or portrait, and the exact direction you're pointing the camera.
Or just drag it
Drag the black circles on the frame lines right on the map to change focal length and direction visually — the settings box updates to match.
Field Photography · PhotoPills
Depth of Field Tool
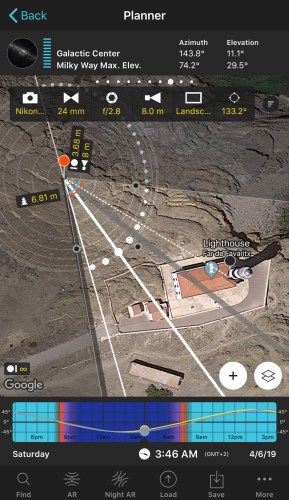
Planner map with the Depth of Field tool active over a lighthouse, showing near limit, far limit, and hyperfocal distance arcs
Planning the Milky Way over a lighthouse — same idea as Lesson 5, now with focus distance built in

DoF does everything FoV does, plus draws exactly what will be in focus — as arcs on the map, based on your aperture and focus distance.
Field Photography · PhotoPills
Reading The DoF Arcs
  1. 🔴
    Focus distance (red arc)
    Where you've told the camera to focus.
  2. ⚪️
    DoF near & far limits (gray arcs)
    Everything between these two arcs is acceptably sharp.
  3. 🔵
    Hyperfocal distance (blue arc)
    Focus here and everything from half that distance to infinity is in focus — the classic landscape trick.
♾️
When the far limit is infinity
There's no arc to draw — the value just appears in the bottom-left corner of the map instead.
Field Photography · PhotoPills
Sun/Moon Tool: Get The Size You Want
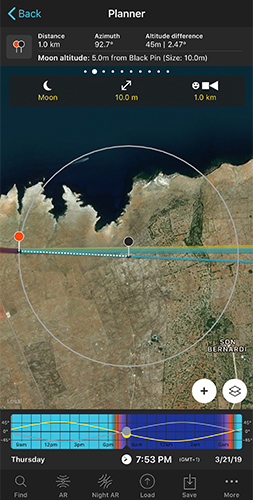
Planner map with the Sun/Moon tool active, showing a gray circle marking the shooting distance for a desired Moon size
The gray circle marks how far back you need to stand for this Moon size

Planning a long-distance shot where the Moon looks huge next to a building? Place the Black Pin on your subject, switch on this tool, and set the Moon size you want. PhotoPills draws a circle showing exactly where to put the Red Pin to get it.

🧮
Goodbye, rule of 100
The old trick was multiplying your desired Moon size by 100 to guess the distance. This tool calculates it precisely instead.
Field Photography · PhotoPills
Putting It Together
  1. 1
    Plan the when and where
    Use the Sun, Moon, or Milky Way tools from earlier lessons first.
  2. 2
    Check the frame with FoV
    Make sure your lens is wide (or tight) enough for the shot you imagine.
  3. 3
    Dial in focus with DoF
    Switch tools once aperture and sharpness start to matter.
  4. 4
    Nail the size with Sun/Moon
    For that dramatic oversized Moon shot, use this tool to find your exact standing distance.
Field Photography · PhotoPills
You Can Plan By The Numbers Now
1
FoV
What's in the frame
2
DoF
What's in focus
3
Sun/Moon
Get the exact size
4
One at a time
Switch tools as needed
UP NEXT
Lesson 7: Exposure, DoF & Hyperfocal Calculators
These same DoF numbers are also available as standalone calculators — no map required — plus a dedicated tool for long-exposure timing.
⌂ Index