Field Photography ยท PhotoPills ยท Lesson 5 Finding & Planning the Milky Way
1 / 10
Field Photography ยท PhotoPills
Finding & Planning the Milky Way
This is the shot PhotoPills was practically built for: knowing exactly when and where the bright core of the Milky Way will rise, months before you ever pack a bag.

Everything in this lesson works together: the Planner's Top Panels tell you when and where; the Milky Way map layer shows it visually; and Night AR lets you compose the shot in the dark, in real time.

๐ŸŒ‘
Start with the Moon
Remember Lesson 4? Check the Moon phase first โ€” you want dates close to New Moon, when the sky is darkest.
Field Photography ยท PhotoPills
What You're Actually Looking For
๐ŸŒŒ
Galactic Center
The brightest, most photogenic part of the Milky Way's core.
๐Ÿ“…
Seasonal
Only visible certain months of the year, depending on your latitude.
๐ŸŒƒ
Dark Skies
Needs a moonless night, away from city light pollution.
๐Ÿ’ก
"Visibility" โ‰  "up in the sky"
The Galactic Center can technically be above the horizon during the day โ€” you just can't see it. PhotoPills' "visibility" window means when it's both up and dark enough to shoot.
Field Photography ยท PhotoPills
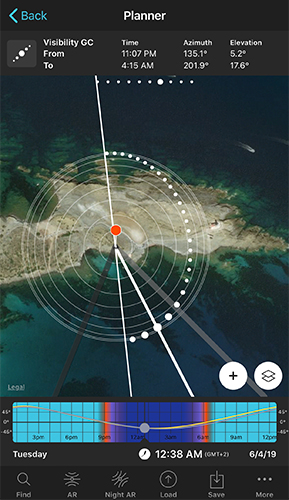
Planner Panel 7: Galactic Center Visibility
Planner top panel showing Galactic Center visibility from and to times, with a dotted arc drawn on the map
The dotted arc traces where the Milky Way will cross the sky

This panel tells you the exact window when the Galactic Center is visible โ€” dark enough and high enough to shoot โ€” for the Red Pin's location and date. The dotted arc on the map shows you its path across the sky.
Field Photography ยท PhotoPills
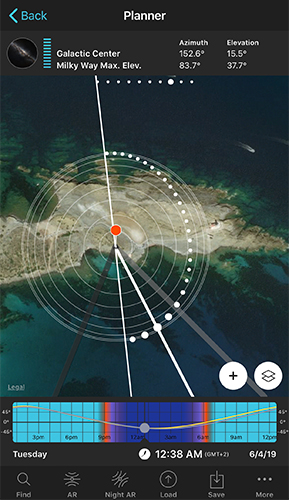
Planner Panel 8: Quality & Position
Planner top panel showing Galactic Center azimuth and elevation, and Milky Way maximum elevation
Azimuth and elevation of the Galactic Center at the selected time
  1. ๐Ÿงญ
    Galactic Center position
    Exact azimuth and elevation โ€” line this up with your foreground subject.
  2. ๐Ÿ“ˆ
    Milky Way max elevation
    How high the arch climbs that night โ€” higher usually means a cleaner shot over the horizon.
๐ŸŒ™
Tap the small Moon icon
On this panel, tapping the Milky Way picture jumps you straight to the next New Moon date.
Field Photography ยท PhotoPills
Turning On The Milky Way Map Layer
  1. 1
    Tap the button on Panel 7
    Or use the Map Settings button (from Lesson 2) and switch on the Milky Way layer.
  2. 2
    Read the arc directly on the map
    The dotted arch, the Galactic Center dot, and the crossing points with the horizon all appear right on the map โ€” no panel-swiping needed.
  3. 3
    Move the Red Pin, watch it update
    Drag the Red Pin around and the arc recalculates live โ€” great for scouting compositions from your couch.
Field Photography ยท PhotoPills
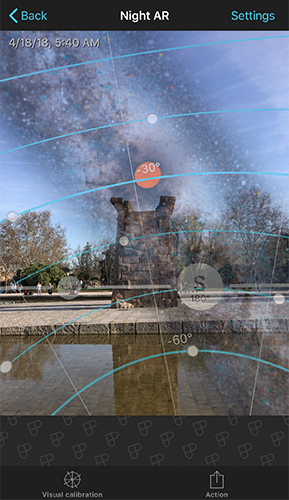
Night AR: See It Before It's Dark
Night AR view showing the Milky Way band overlaid on a real daytime scene with a monument
Point your phone at the scene โ€” even during the day โ€” to preview the Milky Way's position

Open Night AR from the Pills menu and point your phone at your composition. PhotoPills draws the Milky Way, the Galactic Center, and the celestial pole directly over the real world โ€” so you can plan your framing before the sky even gets dark.

Field Photography ยท PhotoPills
Reading The Night AR Overlay
  1. ๐ŸŒŒ
    Milky Way & Galactic Center
    The band itself, with the core marked by a red dot.
  2. โžฐ
    Celestial equator
    A curved reference line across the sky.
  3. ๐ŸŽฏ
    North & south celestial pole
    The point everything appears to rotate around โ€” key for Star Trails, coming up in a later lesson.
โฑ๏ธ
Time travel, right in AR
Swipe left/right on the Night AR view to jump forward or backward in time and watch everything move.
Field Photography ยท PhotoPills
Calibrate Before You Trust It
๐Ÿงฒ
Phone compasses drift
Metal, magnets, and even car dashboards can throw off the accuracy of any AR view.
  1. 1
    Step away from anything electronic or magnetic
    Give the sensors a few seconds to settle down.
  2. 2
    Do the 8-figure gesture
    Trace a figure-8 in the air with your phone, 4-5 times.
  3. 3
    Use Visual Calibration
    Line up the Sun or Moon in AR with the real thing, then confirm โ€” this fine-tunes everything else, including the Milky Way position.
Field Photography ยท PhotoPills
Putting It Together: A Milky Way Shot
  1. 1
    Find a dark date
    Use the Moon Pill's Calendar (Lesson 4) to find nights close to New Moon.
  2. 2
    Check visibility & position
    Panel 7 for the visibility window, Panel 8 for exactly where the core will be.
  3. 3
    Scout from home
    Move the Red Pin and watch the Milky Way map layer update to find a composition.
  4. 4
    Confirm in the field with Night AR
    Once you're there, calibrate and use Night AR to line up the final frame.
Field Photography ยท PhotoPills
You Can Plan A Milky Way Shot Now
1
Panel 7
Visibility window
2
Panel 8
Position & quality
3
Map layer
Scout from home
4
Night AR
Compose in the field
UP NEXT
Lesson 6: Camera Tools on the Map
Once you've found your Milky Way shot, you'll want to know exactly what your lens will capture โ€” that's the Field of View and Depth of Field map tools, next.
โŒ‚ Index