Field Photography · PhotoPills · Lesson 2 The Planner: Your Command Center
1 / 10
Field Photography · PhotoPills
The Planner: Your Command Center
The first tool in the Pills menu — and the one you'll open more than any other. Almost every other lesson in this series builds on what you learn here.

Use the Planner to plan any photo involving the Sun, the Moon, a Solar or Lunar Eclipse, a Meteor Shower, or the Milky Way — for any location on Earth, from your couch or standing in the field.

🧠
The core idea
Planning a photo just means finding the right shooting spot and the right date and time for the scene you're imagining. The Planner exists to make that easy.
Field Photography · PhotoPills
Two Ways To Plan
You know the date
You don't know the date
"I want to shoot the sunset next Sunday"
"I want the Moon over this building — when does that happen?"
Pick a date & time with the Time Bar
Place the Red Pin on the spot, then use Find
Read the Sun/Moon/Milky Way info on the Map & Top Panels
PhotoPills works backward and tells you the date
Move the Red Pin until the shot works
Covered in a later lesson
💡
Most people use the left column
Knowing the date and adjusting the spot is the most common workflow — that's what the rest of this lesson focuses on.
Field Photography · PhotoPills
The 4 Parts Of The Planner
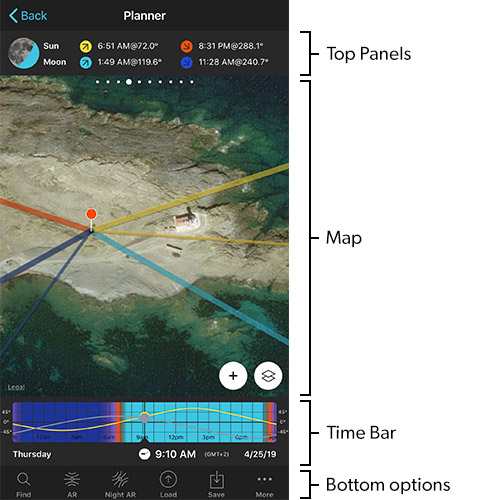
The Planner screen labeled with its four parts: Top Panels, Map, Time Bar, and Bottom options
Every screen in the Planner breaks down into these four areas
📊
Top Panels
Swipe through 11 panels of Sun/Moon/Milky Way/Eclipse info.
🗺️
Map
Where the actual planning happens.
🕐
Time Bar
Drag to change the date and time.
⚙️
Bottom Options
Find, Save, Load, AR, and more.
Field Photography · PhotoPills
The Map & The Two Pins
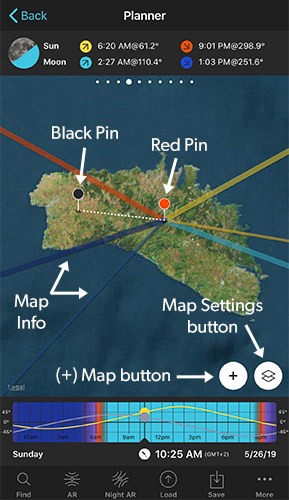
The Planner map labeled with the Red Pin, Black Pin, Map Info, Map Settings button, and (+) Map button
The Map is where the most planning work happens

Everything the Planner shows you is tied to the Red Pin — your shooting spot. The Black Pin is an optional second pin for comparing against a mountain, building, or other obstacle. We'll cover each in the next two slides.
Field Photography · PhotoPills
Red Pin: Your Shooting Spot
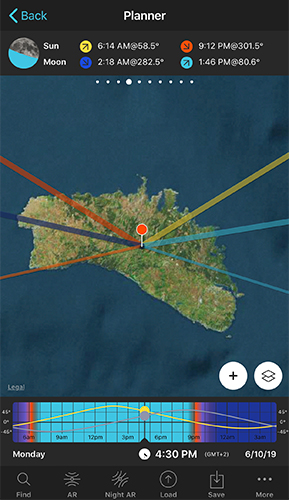
Every piece of information the Planner shows you is relative to wherever the Red Pin sits. Learning to move it fast is the single most useful skill in this app.
  1. Drag and drop
    Tap and hold the Red Pin, drag it to a new spot, lift your finger.
  2. 👆
    Long-press the map
    Tap and hold anywhere on the map to jump the pin there instantly.
  3. 📍
    GPS button
    Tap the (+) Map button, then the GPS icon, to snap the pin to where you're standing.
  4. 🔎
    Address, coordinates, or a saved spot
    Tap Load (bottom bar) to search an address, enter lat/long, or jump to a saved Point of Interest.
🤷
Lost the pin?
Just shake your phone — the map re-centers on the Red Pin and jumps to the current time.
Field Photography · PhotoPills
Black Pin: Reading The Terrain
Optional, and mostly for one specific problem: will a mountain or building block the Sun, Moon, or Milky Way before it reaches the height you need?
  1. 1
    Turn it on from Top Panel 2
    "Pin to pin geodetic info" — tap the Black Pin button there.
  2. 2
    Drop it on the obstacle
    A mountain ridge, a building — whatever might block your subject.
  3. 3
    Compare elevation angles
    Panel 2 shows the angle between the two pins. If that angle is higher than the Sun/Moon's elevation, the obstacle is in the way.
💡
Quick visual check
If the Sun/Moon/Galactic Center line to the Black Pin is dashed, the obstacle hides it. Solid line means it's visible above the obstacle.
Field Photography · PhotoPills
The Two Map Buttons
(+) Map Button
A toolbar of quick actions: GPS, Move Pin, Undo/Redo, Expand Map, Swap Pins, Compass, and more.
🎛️
Map Settings Button
Choose Camera or Drone mode, map type, and exactly what info layers show on the map.
📌
Both live in the bottom-right corner of the map
We'll go deep on the Map Settings button — including the Field of View and Depth of Field map tools — in a later lesson.
Field Photography · PhotoPills
The Time Bar
The Time Bar below the map, showing a 24-hour range with sunrise, sunset, and twilight colors
The colorful bar just below the map
  1. ↔️
    Drag it
    Left to go forward in time, right to go backward. The color band shows you day, night, and every twilight in between.
  2. 👆
    Tap the center
    Set a specific future date, time, and time zone.
  3. ⏱️
    Long-press the bar
    Switch between a 24-hour range and a 1-hour range for finer control.
  4. ⏭️
    Tap either edge
    Jump straight to the next or previous sunrise, sunset, golden hour, or twilight.
Field Photography · PhotoPills
Bottom Options At A Glance
  1. 🔍
    Find
    Don't know the date? Find the date/time when the Sun or Moon lines up where you want it.
  2. 📷
    AR & Night AR
    Point your phone at the real world to see the Sun/Moon path (AR) or Milky Way and Star Trails (Night AR) overlaid live.
  3. 💾
    Load & Save
    Save a shot as a Plan, or load one back in — plus load the Red Pin to an address, coordinate, or saved photo location.
  4. •••
    More: Date, Altitudes, Horizon, Action
    Set an exact date/time, correct for elevation, adjust for shooting from a mountain, or share the plan.
📚
More on these later
Find, AR, and Save/Load each get their own deep-dive once we've covered the Sun, Moon, and Milky Way tools that make them useful.
Field Photography · PhotoPills
You Know Your Way Around Now
1
4 parts
Panels, Map, Time Bar, Options
2
Red Pin
Your shooting spot
3
Black Pin
Checks for obstacles
4
Time Bar
Drag to change time
UP NEXT
Lesson 3: Planning Sun Light
Now that you can drive the Planner, next lesson puts it to work — reading the Top Panels for sunrise, sunset, golden hour, blue hour, and twilight.
⌂ Index